Hey there, gorgeous! Are you rocking hooded eyes and feeling a little lost in the makeup world? You’re not alone! Hooded eyes, where the fold of your eyelid covers some of your upper lash line, can be tricky to work with.
But fear not, because with a few simple tricks, you can create a stunning everyday makeup routine that brightens, defines, and makes your beautiful eyes pop!
In this guide, we’ll break down a beginner-friendly everyday makeup routine specifically for hooded eyes. We’ll cover everything from prepping your lids to defining your lashes, all with easy-to-follow steps and explanations.
So, grab your makeup brushes, get ready to unleash your inner makeup artist, and let’s dive in!
The Perks of a Hooded Eye Makeup Routine:
Before we jump into the steps, let’s talk about why having a go-to makeup routine is a game-changer for hooded eyes.
Here’s what you can expect:
- Brighter, Wide-Awake Eyes: By using specific eyeshadow placements and techniques, we can create the illusion of a larger eye area, making you look more awake and refreshed.
- Enhanced Definition: The right makeup application can define your beautiful eye shape, highlighting your lashes and adding depth.
- Lifted Appearance: Certain tricks can help counteract the hooded effect, giving your eyes a more lifted and youthful look.
- Confidence Boost: Mastering a makeup routine that flatters your features can do wonders for your confidence!
Prep Work is Key!
When it comes to hooded eyes, a good primer is your best friend. Primer creates a smooth canvas for your eyeshadow, preventing it from creasing and smudging throughout the day.
Here’s why it’s important:
- Crease Control: Hooded eyes are more prone to creasing because the fold of your eyelid can rub against your makeup. Primer acts as a barrier, keeping your eyeshadow in place.
- Color Vibrancy: Primer helps your eyeshadow colors appear more vibrant and last longer.
- Smoother Application: It creates a smooth surface for your eyeshadow to blend seamlessly.
How to Apply Primer:
- Choose an eye primer suitable for your skin type. Opt for oil-free formulas if you have oily lids.
- Dab a small amount of primer onto your eyelid using your fingertip or a flat eyeshadow brush.
- Gently blend the primer outwards towards your brow bone, keeping it within the area where you’ll be applying your eyeshadow.
- Let the primer dry completely before moving on to your eyeshadow.
Eyeshadow Application: Your New BFF
Now that your lids are prepped for perfection, let’s talk about eyeshadow! Here, we’ll focus on two key techniques – defining the crease and highlighting the brow bone – to create a beautiful base for your hooded eyes.
Shadow for Definition:
For your everyday look, neutral matte eyeshadows are your best bet. These shades (think taupe, light brown, or shades slightly darker than your skin tone) add definition to your crease without overwhelming your eyes.
Here’s how to apply your crease shade:
- Using a fluffy eyeshadow brush, gently dip it into your chosen crease shade. Tap off any excess powder to avoid heavy application.
- Find your crease by looking straight into the mirror and gently blinking. The crease is the natural fold in your eyelid that appears when you close your eyes.
- Start by applying the eyeshadow in the crease with a windshield wiper motion, gently moving the brush back and forth.
- Blend the color upwards and outwards towards your brow bone, softening the edges for a natural look.
- You can build up the intensity of the color gradually for more definition, but remember, with hooded eyes, less is often more.
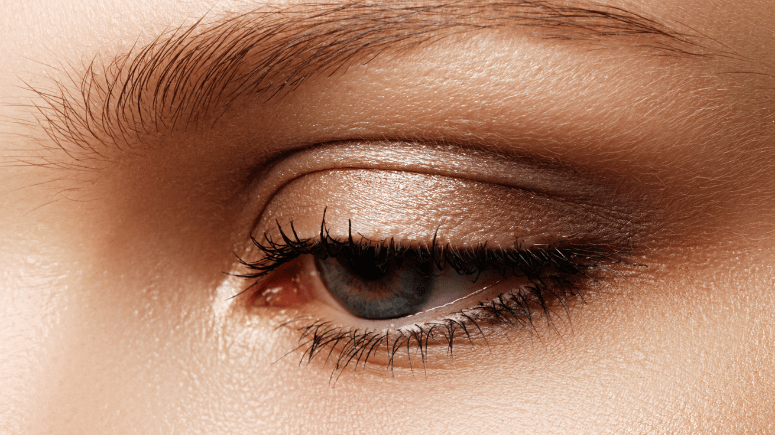
Highlighting the High Points:
Now, let’s add a touch of light to your brow bone to make your eyes appear even brighter.
- Choose a shimmery eyeshadow shade that’s a shade or two lighter than your skin tone.
- Using a smaller, shader brush, pick up a small amount of the highlight shade.
- Apply the highlight shade directly below your brow bone, focusing on the center of your brow.
- Blend the highlight shade seamlessly into the crease shade you applied earlier.
Lining and Defining: It’s All About Placement
Eyeliner can be a great tool for defining your eyes, but with hooded eyes, placement is key. Here’s how to create a subtle, flattering line:
Eyeliner Options:
For beginners with hooded eyes, a softer eyeliner option like a brown pencil liner is a good choice. It allows for more control and easier blending compared to liquid or gel liners.
Liner Application:
- Start with Tightlining (Optional): If you want a more dramatic look, you can try tightlining. This involves gently applying the eyeliner pencil along your upper waterline (the inner rim of your eyelid). However, for hooded eyes, tightlining can transfer to your upper eyelid, so proceed with caution and use a waterproof formula.
- Line the Upper Lash Line: With your chosen eyeliner, look down into a mirror and gently apply the liner along your upper lash line, starting from the outer third of your eye and working your way inwards. Focus on creating a thin line that fills in any gaps between your lashes.
Pro Tip: Instead of drawing a solid line, try creating small dots with the eyeliner pencil in between your lashes.
This creates a more natural, subtle definition.
- Lift and Flick: To create a lifting effect, instead of extending the liner all the way to the inner corner of your eye, stop slightly before you reach the tear duct. You can also create a small flick at the outer corner, extending the line upwards slightly to create a lifting illusion.
- Blend it Out (Optional): If you find the line too harsh, use a small blending brush with a little bit of your crease shade to gently soften the edges of your eyeliner.
Lashes for Days!
Now that your eyes are beautifully defined with eyeshadow and eyeliner, let’s make those lashes stand out!
Eyelash Curler is Your BFF:
An eyelash curler is a game-changer for hooded eyes. It helps lift and curl your lashes, making your eyes appear more open and awake. Here’s how to use it:
- Gently squeeze the curler to open it.
- Place the curler on your upper lashes as close to the lash line as possible without pinching your skin.
- Squeeze the curler gently and hold for a few seconds.
- Repeat the process closer to the tips of your lashes for a more dramatic curl.
Applying Mascara:
Now that your lashes are beautifully curled, let’s add some volume and definition with mascara.
- Choose a volumizing mascara that won’t weigh down your lashes.
- Look down into a mirror and wiggle the mascara wand from the base of your lashes to the tips, focusing on the outer lashes for an opening effect.
- You can apply a second coat for extra drama, but be careful not to clump your lashes.
Finishing Touches: The Final Flourish
Almost there! Here are some finishing touches to complete your beautiful everyday eye look:
- Brows (Optional): If you have sparse brows, you can gently fill them in with a brow pencil or brow powder in a shade that matches your natural hair color. Remember, with hooded eyes, it’s best to keep your brows natural-looking and avoid drawing them too high.
- Lower Lash Line (Optional): For a slightly more dramatic look, you can apply a thin line of eyeliner or a smudged eyeshadow along your lower lash line. However, for hooded eyes, too much emphasis on the lower lash line can make your eyes appear smaller, so be light-handed.
There you have it! With these simple steps, you can create a gorgeous everyday makeup routine that flatters your beautiful hooded eyes. Remember, practice makes perfect! Don’t be afraid to experiment and find what works best for you.
Here are some additional tips:
- High-Quality Tools Make a Difference: Invest in good-quality makeup brushes that are specifically designed for eyeshadow application.
- Less is More: When you have hooded eyes, it’s often better to apply a lighter amount of makeup and blend it well.
- Have Fun! Makeup should be a way to express yourself and feel confident. Don’t be afraid to play with colors and experiment with different looks.
Bonus Section: Common Mistakes to Avoid
- Applying Eyeshadow Too High: Applying eyeshadow too high can make your hooded eyes appear even more hooded.
- Heavy Eyeliner Across the Lash Line: A thick line of eyeliner across your entire lash line can close off your eyes and make them appear smaller.
- Clumpy Mascara: Clumpy lashes can weigh down your eyes and make them look droopy.
Dark and Smoky Eyeshadow: While smoky eyes can be stunning, very dark and dramatic eyeshadow looks can overwhelm hooded eyes.